Skip to content

Legacy blog

PowerPivot - Choosing a calculated column type

clip_image001Lately I have been using PowerPivot (more details on this at the end of this post) and I came across a problem whose solution might interest others.

The Problem

As I created a calculated column based on a date column, the result was always displayed as a number instead of a date. Worst the drop down list where you can choose the type of the column was greyed out. Here is an example; CalculatedColumn1 is created using some number function (ROUNDDOWN). Yet I am working with Dates, while PowerPivot understandably consider the results to be a number, one can’t override this automatic setting of the Data Type. The “Data Type” DropDown list is just greyed out with a value of Number (Nombre in French in the screenshot below) : image The obvious drawback is that my column isn’t very readable, I mean no normal human beings can understand that 40255 mean 18/03/2010 00:00, else leave me a comment, I would be interested to meet you :)

My solution

Here is my workaround, just throw a date function in your function. In my case I choose to add TIME(0,0,0) which is a neutral operation : clip_image004 Thus PowerPivot will understand that your column is a date, and you will be able to select a Date format: image

Some Information on PowerPivot (aka Gemini)

For those who don’t know what PowerPivot is, you might know by its codename, Gemini. It is a Microsoft Addin for Excel and SharePoint 2010 that allows you to analyze tons of data very easily. It’s supposedly really fast due to its in In Memory Analysis. For BI noobs (a group I am sadly part of) you might see it as a personal version of Anaysis Service (PowerPivot for Excel) or as a Team flavored BI (PowerPivot for SharePoint), on this subject I found this blog post by the PowerPivot Team very interesting (http://blogs.msdn.com/powerpivot/archive/2010/03/12/comparing-analysis-services-and-powerpivot.aspx). Microsoft released a series of nice videos to explain PowerPivot, here is the first one : Here is what PowerPivot promises and, as far as my experience went, delivers:

  • Analysis (Pivot Table and graph) of Data from multiples sources (DataBase, Excel files, flat files)
  • Analysis of huge volume Data (I am talking millions here)
  • Integration of simple relational constraint between your data sources
  • And maybe the coolest part is that this is available to any Information Worker already familiar with Excel. I would take this one with a grain of salt; your Information Worker needs to be quite technical savvy to fully benefit from this tool.

Additionally the Integration with SharePoint is supposed to bring added performance and to deliver your reports more easily to multiple persons. I haven’t tested the integration, yet! After spending some quality time with PowerPivot I have got to admit being very enthusiastic about this product. I can see numerous scenarii where it would have saved me hours in the past (More details and cool links at the end of the post). I just can’t wait to set my hands on the RTM version of Excel 2010 and PowerPivot to enjoy this tool without worrying so much about the too frequent crashes (in my experience double clicking on a graph horizontal axis freezes quite often). To go further I would advise you to start with the official PowerPivot site (http://www.powerpivot.com ), especially the demo part. To my French reader I would also recommend the hilarious BI video by Têtes à Claques that you might have enjoyed at the 2010 Techdays in Paris :(http://www.microsoft.com/france/serveur/sql/secretedouard/ )


Replacing delegate controls with custom actions

jQuery When using jQuery in a SharePoint application, you obviously need to deploy the jQuery javascript file. The deploy part is no big deal, the referencing is a bit more complex. In this post is the detail of a new way to reference the resources, it involves using Custom Action to load external resources such as javascript or css.

Current Solution

As explained by Jan Tielens (http://weblogs.asp.net/jan/archive/2008/11/20/sharepoint-2007-and-jquery-1.aspx there are usually three solutions considered to be available to do that:

  • Add a <script src> tag in a Content Editor Web Part
  • Add a <script src> tag in the Master Page itself
  • Add a <script src> tag dynamically in the <head> using a DelegateControl placed in the standard master pages

In my case, only the third solution was usable. So I went with it, created my feature, added it to my solution.

The problem

The story would have ended here if it wasn’t for a detail I discovered quickly enough; the standard publishing pages (BlueGlassBand and so forth) do not have the AdditionalPageHead delegate control defined. Thus my solution worked really well with collaboration pages but failed on publishing pages. The obvious solution was to modify the master page used by my client to add the Delegate Control tag but the client didn’t want any modification to the master page. Thus I was at this point :

How do I add a reference to some javascript and css files in the HTML <head> section of a page generated by a master page that doesn’t include any DelegateControl and that I can’t modify.

The solution

After digging a bit I found a very surprising (to me at least) but fully working solution. Use a Custom Action. Nuts 2 on Flickr by Steffenz Before you start thinking I am nuts, let me explain, If you take a close look at the MSDN you will see that you can specify a ControlAssembly and a ControlClass, guess what, the class specified will do the actual rendering. Custom Actions aren’t just for Site Action Menu entries, ECB and so forth. So here is more detail:

  • Create a class inheriting from CompositeControl
  • Override the constructor so that I can plug a method in the Load event.
  • In my method triggered on load, access the page header and add a LiteralControl to declare the scripts and css I need

And here is a stripped down but fully working version of my code :

using System;
using System.Collections.Generic;
using System.Text;
using System.Web.UI.WebControls;
using System.Web.UI.HtmlControls;
using System.Web.UI;
namespace ItemsInTheSafeControl
{
class SiteActionMenu : CompositeControl
  {
publicconststring mStrIncludedRessources = "<script type=\"text/javascript\" src=\"/_layouts/jquery-1.3.2.min.js\">";
public SiteActionMenu()
      {
this.Load += new EventHandler(SiteActionMenu_Load);
      }
protectedvoid SiteActionMenu_Load(object Sender, EventArgs E)
      {
          LiteralControl vLiteralControl = new LiteralControl(SiteActionMenu.mStrIncludedRessources);
this.Page.Header.Controls.Add(vLiteralControl);
      }
protectedoverridevoid Render(HtmlTextWriter Writer)
      {
      }
  }
}

To plug this code as a custom action, I use the following ElementManifest

<?xmlversion="1.0"encoding="utf-8" ?>
<Elementsxmlns="http://schemas.microsoft.com/sharepoint/">
<CustomAction
Id="SAG_CR_Ressources_Deploy_Action"
Location="Microsoft.SharePoint.StandardMenu"
GroupId="SiteActions"
ControlAssembly="SAG.CommentsRating, Version=1.0.0.0, Culture=neutral, PublicKeyToken=406cabeaa3d2932a"
ControlClass="SAG.CommentsRating.WebParts.SiteActionMenu">
</CustomAction>
</Elements>

Now you just package the ElementManifest in a feature, add your dll and create a solution out of it (wspbuilder is my tool of choice). Your solution manifest will need to specify a SafeControl tag to be added for your class/namespace in the web.config for your CompositeControl. Here you go, a non-intrusive quite generic solution to plug additional resources into SharePoint.

JSONP your ASP.Net Web Service – Direction to your destination

The classical SOAP-WSDL Web Service stack I was recently developing a Comments & Rating SharePoint solution. As postbacks were forbidden (for good reasons, who loves postbacks ?), we used jQuery with a custom Web Service hosted in a SharePoint web application to try offering a nice experience to end-users. The custom WebService was to be invoked from pages located on foreign domains. As we had no control over those foreign sites (they weren’t even ASP.Net sites), we had to use JSONP to make it works. While there is no major difficulty in JSONPing your ASP.net web services even if it is hosted in a SharePoint Web Application, I stumbled upon a couple of problem I wanted to share with you. So let me take you on the road to JSONP in your SharePoint solutions.

Freeway opened - a few turn on the road but no trouble ahead

Free way opened - a few turn on the road but no trouble ahead I will not cover the basics of making your web service JSONP compliant, other bloggers have done a great job at that ( I would recommend Adel Khalil’s and Jason Grundy’s (check the comments) posts among others). Neither will I talk about the basis of JSONP, just let me tell you it is an hack of the HTML script tag intended use that will let you call Web Services from other domains. Other ressources will let you understand why we need this hack (Jonathan Snook cross domain ajax : a quick summary) and what this hack does (Raymond Camden’s article does a great job at this). There are really very few specifics to SharePoint as far as the Web Service is concerned. My SharePoint solution pushes the asmx file in a subfolder of the Layouts folder along with a web.config specific to this folder that contains the necessary configuration to support JSON (thus JSONP) in the Web Service. The Web Service code behind is deployed in the GAC.

Roadblock #1 – Does size matters ?

Roadblock #1 Once everything was it in place I started to test the Web Service and everything was going fine. But as I started to push more and data, at one point the web service started not to work anymore. As soon as the Web Service had less data to return it would works again. To check what was going wrong, I fired up fiddler to check the web service response and saw this :

Jsonp1260899050254({"d":{"__type":"……. );jsonp1260899050254(…ErrorMessage":null}});

As you can see it seemed like my response was cut at one point (always between 16 000 and 17 000 characters) with a ‘)’, then the name of the callback method was added again and finally it was closed correctly. I don’t know what the problem was exactly. I suspect the the streambuffer used in the HttpHandler suggested by Adel Khalil’s was somewhat full at about 16 000 characters. Thus the compliance method would be run twice. Being onsite and needing to fix the problem ASAP I didn’t spent time investigating and rushed into finding a solution. I tried to simplify the compliance HttpModule as much as possible and here is what I come up with:

publicclass JsonHttpModule : IHttpModule
{
privateconststring JSON_CONTENT_TYPE = "application/json; charset=utf-8";
publicvoid Dispose()
{
}
publicvoid Init(HttpApplication app)
{
   app.BeginRequest += OnBeginRequest;
   app.EndRequest += new EventHandler(OnEndRequest);
}
publicvoid OnBeginRequest(object sender, EventArgs e)
{
   HttpApplication app = (HttpApplication)sender;
   HttpRequest request = app.Request;
//Make sure we only apply to our Web Service
if (request.Url.AbsolutePath.ToLower().Contains("MyWS.asmx"))
   {
if (string.IsNullOrEmpty(app.Context.Request.ContentType))
       {
           app.Context.Request.ContentType = JSON_CONTENT_TYPE;
       }
       app.Context.Response.Write(app.Context.Request.Params["callback"] + "(");
   }
}
void OnEndRequest(object sender, EventArgs e)
{
   HttpApplication app = (HttpApplication)sender;
   HttpRequest request = app.Request;
if (request.Url.AbsolutePath.ToLower().Contains("MyWS.asmx"))
   {
       app.Context.Response.Write(")");
   }
}
}

As you can see my HttpModule is doing as little as possible:

  • Before generating the response : Add the name of callback from the QueryString parameters and a ‘(‘ to the response if the HttpModule is running for my web Service
  • After generating the response : Add ‘);’ at the end of the response if the HttpModule is running for my WebService

imageSimple enough for my problem to go away, moreover it meant less code to maintain in the future. If needed, it is possible to add a switch to make it SOAP and straight JSON compliant, if no callback parameter is given it wouldn’t do anything to the response. It would only take a couple more lines.

Roadblocks #2 : Definitely a matter of size

Roadblocks #2 : Definitely  a matter of size It could have ended like that, a running ASP.Net JSONP compliant Web Service, but it didn’t. Keeping testing the web service with more and more data, I hit another point where the Web Service seemed not to work. Once again, I called my good friend fiddler for help. It soon became apparent that the server would only return 500 responses. 500 http error code Http 500 status code means that an internal server error happened. So I went searching through my application logs, SharePoint logs, the Windows logs, … but couldn’t the slightest beginning of a reason for my problem. Using the debugger I found out that my Web Service methods were called correctly and that no exceptions were thrown by my code. It was getting weirder and weirder. The response data were correctly generated and returned by my Web Service. I didn’t know exactly what happened but figured that it had to do with the way ASP.Net serialized (‘converted’ if you wish) my response object. As it happened when the size of object increased I started to look for a parameter that would cap the JSONP response size. Such a parameter exists. By default this parameter specify that no response longer than 102 400 character can be serialized to JSONP. For reference you can consult: http://msdn.microsoft.com/en-us/library/bb763183.aspx It takes place in the web.config as illustrated below:

<configuration>
<system.web.extensions>
<scripting>
<webServices>
<jsonSerialization maxJsonLength="102400"/>
</webServices>
</scripting>
</system.web.extensions>
</configuration>

imageAnd here it is, problem solved. image Yet I have to admit being upset when I found out the solution to my problem, the fact no error messages where logged anywhere I could found them. How are we supposed to diagnose our problem when the only error message is a 500 Http Error code?
Finally arriving

Here I am, I now have a working WSP that deploys my JSONP web service in my SharePoint Web Application. Using jQuery to consume the Web Service it is even possible to use my application from non SharePoint web pages hosted on other web servers.

Retrieve List and View GUIDs with a bookmarklet

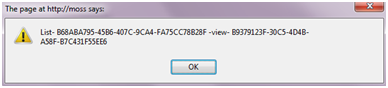
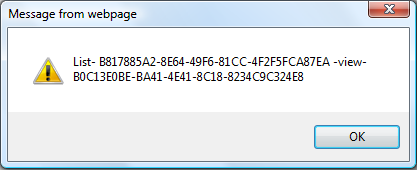
image As I am often using SharePoint Designer, I regulary need to get the lists or views guids on my WSS or MOSS sites. Until now I would use SharePoint Manager or access the List or View settings to get the IDs I needed from the URL. Not a big deal but definitely a pain. I now have a very simple solution to solve this problem, a bookmarklet. I just drag and drop the following links to the bookmarks bar of my browser and click on these links when I am on a SharePoint List or library display. The IDs are then either Popuped (Use CTRL+C to copy the full popup message on Internet Explorer, selection is possible in Firefox) or wrote on the page.

Absolutely no changes are necessary on the server side and you just need to add a bookmark to your browser on the client-side.

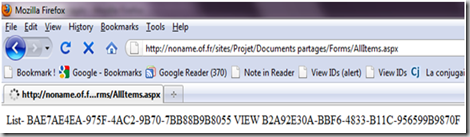
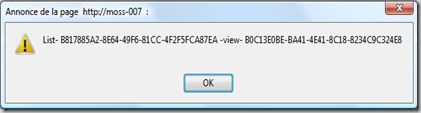
The first bookmarklet shows a pupup with the IDs looking like image Drag and drop this link (View IDs (alert);for(i=0;i<mI.length;i++){if(mI[i].id.indexOf('ModifyView')!=%20-1)vieItem%20=%20mI[i];}baSt=vieItem.getAttribute('onMenuClick');enLisInd=%20baSt.indexOf('%257D');liI=baSt.substring(baSt.indexOf('%257B')+3,enLisInd);baSt=baSt.substr(enLisInd%20+%203);viI=baSt.substring(baSt.indexOf('%257B')+3,baSt.indexOf('%257D'));alert('List-%20'+liI.replace(/%252D/gi,'-')+'%20-view-%20'+viI.replace(/%252D/gi,'-'));})) to the bookmark tab, it is usually found just under the address bar. The second one will replace the page with the IDs like that image Drag and drop this link (View IDs;for(i=0;i<mI.length;i++){if(mI[i].id.indexOf('ModifyView')!=%20-1)vieItem%20=%20mI[i];}baSt=vieItem.getAttribute('onMenuClick');enLisInd=%20baSt.indexOf('%257D');liI=baSt.substring(baSt.indexOf('%257B')+3,enLisInd);baSt=baSt.substr(enLisInd%20+%203);viI=baSt.substring(baSt.indexOf('%257B')+3,baSt.indexOf('%257D'));document.write('List-%20'+liI.replace(/%252D/gi,'-')+'%20VIEW%20'+viI.replace(/%252D/gi,'-'));}))for this version The bookmarklet are simple javascript code that parses the page looking for the Edit View link. They then get the IDs from this link before decoding them. The drawback of my method is that you need to have sufficient permissions to modify the view. The javascript code is displayed below for your information or if you have some trouble adding the links to your bookmarks with Drag’n Drop.

<a href="javascript:{mI=document.getElementsByTagName('ie:menuitem');for(i=0;i<mI.length;i++){if(mI[i].id.indexOf('ModifyView')!= -1)vieItem = mI[i];}baSt=vieItem.getAttribute('onMenuClick');enLisInd= baSt.indexOf('%257D');liI=baSt.substring(baSt.indexOf('%257B')+3,enLisInd);baSt=baSt.substr(enLisInd + 3);viI=baSt.substring(baSt.indexOf('%257B')+3,baSt.indexOf('%257D'));alert('List- '+liI.replace(/%252D/gi,'-')+' -view- '+viI.replace(/%252D/gi,'-'));}">View IDs (alert)</a>

<a href="javascript:{mI=document.getElementsByTagName('ie:menuitem');for(i=0;i<mI.length;i++){if(mI[i].id.indexOf('ModifyView')!= -1)vieItem = mI[i];}baSt=vieItem.getAttribute('onMenuClick');enLisInd= baSt.indexOf('%257D');liI=baSt.substring(baSt.indexOf('%257B')+3,enLisInd);baSt=baSt.substr(enLisInd + 3);viI=baSt.substring(baSt.indexOf('%257B')+3,baSt.indexOf('%257D'));document.write('List- '+liI.replace(/%252D/gi,'-')+' VIEW '+viI.replace(/%252D/gi,'-'));}">View IDs</a>

The javascript is pretty nasty for a good reason, Internet Explorer 6 bookmarks are limited at about 500 characters. Even if my scripts aren’t very complex, a 500 characters limit is very short. Tested on Internet Explorer 6, 8 and Firefox 3 on a MOSS 2007 – SP2 farm in English and French. Please be aware that Internet Explorer will display a security warning when adding the bookmark. Hope you enjoy my bookmarklets ! Edit : Just so you know, I found a bug in these bookmarlet and just fixed it.

The worm ate my SharePoint homework

Let me start this post with a question I had to answer today

If your SharePoint Web Front End server suddenly loses its connection to the database server. What is the first thing that comes to your mind?

In my case, plenty of stuff, from pure hardware breakdown to a very convoluted side effect of my last modification. The latest being a click on “Add a Link” in the navigation settings, I was a bit skeptic about that :) Actually, I hadn't even started to imagine the actual cause. After checking the status of the DB server and digging through the event logs, it seemed like there was a problem with some account that had “insufficient privileges”. Opening my favorite AD Explorer (AdExplorer by SysInternals actually ;-) ), I checked the service accounts used by MOSS and bingo, they were locked. Telling the client about my findings they found out why quickly. Some computers were infected by a variant of conflicker, a worm that would try breaking admins password open using a dictionary attack, thus locking the accounts. So here is today finding:

When the WFE loses its connection to the database server, check your antivirus ;-)

Photo : Structure of the influenza virus / Influenza en México 6 credit Hector Aiza @Flickr

Consuming Search Web Service in SharePoint Designer - the encoding problem

The other day I was using the DataFormWebPart (DataViewWebPart) to consume the MOSS Search web service. As I had some advanced parameterization to do, the SharePoint Designer GUI wasn't enough, so I had to modify the encoded QueryXml. You know those stuff looking like :

_x0020_Rank_x002c__x0020_Size_x002c__x0020_Description_x002c__x0020_

As you can see it's a real pleasure to edit such encoded text. So I decided to roll up my sleeves and made a Quick 'nDirty HTML page with some javascript to encode/decode such encoding. Here is the page : jonathanroussel.com/unicodec

SharePoint Lookup Columns on steroids with CAML

In an earlier post I told you about a CAML query you could use to add a cross-site lookup column, pointing on a list from any other site of the same collection.     No suspens for this post, here is the Query :

<Field Type="Lookup" DisplayName="Office" Required="FALSE" List="{}" WebId="" ShowField="Title" UnlimitedLengthInDocumentLibrary="FALSE" StaticName="Office" Name="Office"/>

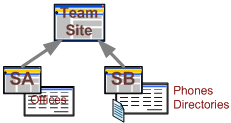
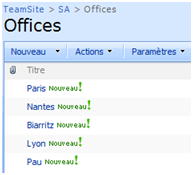
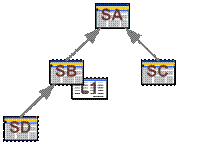
Where List and ShowField specifies the list and list column to lookup from. The WebId is the id of the Web where this list is. If you take a close look at the Field reference: http://msdn.microsoft.com/en-us/library/ms437580.aspx you will notice that the WebId attribute isn’t specified, yet I am using it. Well I obviously didn’t invent this parameter, as I explained in my previous post, this cross site lookup only worked if using a web content type. So I checked the field definition of the working cross site lookup I created using a Document Library template and noticed this parameter using SharePoint Manager 2007 www.codeplex.com/spm. By using it I can do create a working cross site lookup column without having to create a web content type. A short demo might help you understand how it works: I have the following site hierarchy: image I want to add a column in the Phones Directories document library, this column shall be a lookup to the Title column of the Offices List. With standard functionality it’s a no go but let’s try a CAML query to create this column. Assuming that:

  • SA ID is 460dd869-7508-4eba-8c34-bfeffcc823fc
  • Offices ID is 45BE507B-DF8C-43BC-AF6A-4C05EECA13DA

I know that I should use the following query:

<Field Type="Lookup" DisplayName="Office" Required="FALSE" List="{45BE507B-DF8C-43BC-AF6A-4C05EECA13DA}" WebId="460dd869-7508-4eba-8c34-bfeffcc823fc" ShowField="Title" UnlimitedLengthInDocumentLibrary="FALSE" StaticName="Office" Name="Office"/>

As PowerShell is my BFF when dealing with SharePoint, I wrote a short script to create this column :

# IT Joe – http://blog.jonathanroussel.com
# One Shot Script - Add a column to a list using a CAML query [System.Reflection.Assembly]::LoadWithPartialName("Microsoft.SharePoint") $siteurl = "http://moss:81/SB"
$mysite=new-object Microsoft.SharePoint.SPSite($siteurl) if($mysite)
{
$web = $mysite.openweb()
if($web)
{
"WEB : " + $web.name + " / " + $web.title + " @ " + $web.url
$list =$web.lists["PhoneDirectories"]
if($list)
{
"List : " + $list.title
$list.Fields.AddFieldAsXml('<Field Type="Lookup" DisplayName="Office" Required="FALSE" List="{45BE507B-DF8C-43BC-AF6A-4C05EECA13DA}" WebId="460dd869-7508-4eba-8c34-bfeffcc823fc" ShowField="Title" UnlimitedLengthInDocumentLibrary="FALSE" StaticName="Office" Name="Office"/>')
}
$web.dispose()
}
$mysite.Dispose()
}

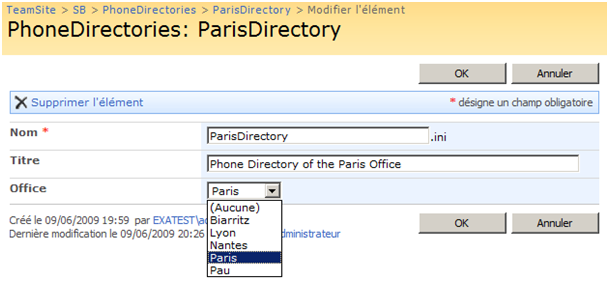
After running the script I open an item of the PhoneDirectories library and …. Voila: image As you can the Office column takes its value from: image One more remarks, if you try adding a new column “Office2” looking up the same list without the webid with the following CAML query :

<Field Type="Lookup" DisplayName="Office2" Required="FALSE" List="{45BE507B-DF8C-43BC-AF6A-4C05EECA13DA}" ShowField="Title" UnlimitedLengthInDocumentLibrary="FALSE" StaticName="Office2" Name="Office2"/>

You will see that this column works. I can imagine you thinking

“Then why did he told us a minute ago to add this undocumented obscure WebId parameter, I bet he invented it to try to look smart. What a fiasco!”

To answer this question I will just let you remove the original Office column and see for yourself if this Office2 column is still working... Ok, spoiler alert, it won’t work. Seems like SharePoint needs at least one reference to the Web where the list to lookup is. I don’t know if you will find It usefull but I hope you will like the trick. Photo : Nelson's Column credit vgm8383 @Flickr

SharePoint Lookup Column and its limits

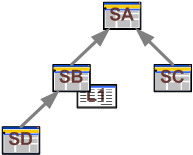
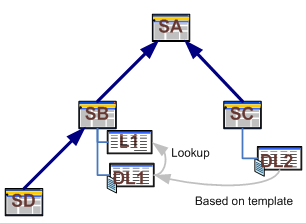
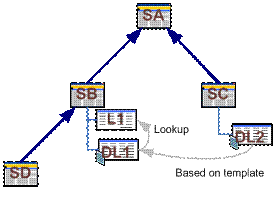
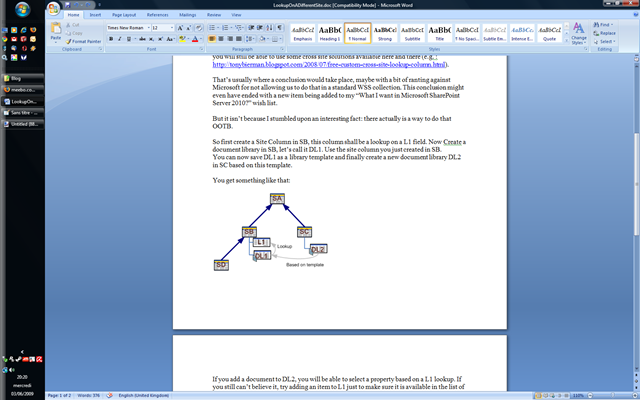
Lookup Pop by Tomas SharePoint comes with a very nice feature, the possibility to create columns (for lists, libraries metadata) based on lookup on other lists. While this is very nice, it come with a huge limitation, you can only lookup list on the site where you are creating the column. If it is a site column, you will still be able to use it in subsites but that’s it. If for example you have the following sites/subsites image Where SA, SB, SC, SD are SharePoint Sites (SPWebs) and SB includes a List L1. There is no Out Of The Box (OOTB) means to create a lookup in SC on L1. In case of need you will still be able to use some cross site solutions available here and there (e.g. : http://tonybierman.blogspot.com/2008/07/free-custom-cross-site-lookup-column.html). That’s usually where my conclusion would take place, maybe with a bit of ranting against Microsoft for not allowing us to do that in a standard WSS collection. This conclusion might even have ended with a new item being added to my “What I want in Microsoft SharePoint Server 2010?” wish list. But it isn’t because I stumbled upon an interesting fact: there actually is a way to do that OOTB. So first create a Site Column in SB, this column shall be a lookup on a L1 field. Now Create a document library in SB, let’s call it DL1. Use the site column you just created in SB. You can now save DL1 as a library template and finally create a new document library DL2 in SC based on this template. You get something like that: image If you add a document to DL2, you will be able to select a property based on a L1 lookup. If you still can’t believe it, try adding an item to L1 just to make sure it is available in the list of choice in DL2. I don’t think it is usable in real life but it triggered something in me. It is clearly possible to lookup a field from another list using only standard features. I then decided to give it a try using CAML to create my lookup field and guess what it works very well. I will give you more details very soon! Edit: More Details in a newer post. Photo : Lookup Pop credit Tomas @Flickr

SharePoint Walktrough - Displaying List Items with their attachments Part 1/2

image The SharePoint Out Of the Box List View Web Part is quite powerful, yet it isn’t able to display the attachments of a List Item. It can show if an item has any attachments (with a nice paper-clip icon) but you won’t be able to download these attachments directly. As with most SharePoint limitation, there is a workaround. Drasko Popovic wrote about a JavaScript based workaround on CodeProject you might want to check out at http://www.codeproject.com/KB/sharepoint/DataViewAttachments.aspx. In this post I want to presents you another workaround where all processing are done server-side with a single Web Service call (Lists.asmx). You will need SharePoint Designer 2007 (freely downloadable since the 2nd April 2009 at http://www.microsoft.com/downloads/details.aspx?FamilyID=baa3ad86-bfc1-4bd4-9812-d9e710d44f42&displaylang=en ) and of course a MOSS or WSS instance. As this walkthrough is pretty long for a blog post, it is split into two parts. If you already how to create a Data View web part to display the elements of a list through calls to the Lists.asmx web service, I would suggest you to move to part 2 of this walkthrough.

0 – Principle/Rationale

We have a list in a SharePoint site and want to display the titles of this list’s elements along with direct links to their attachments. We are going to create a Data View Web Part using SharePoint Designer, this Data View will consume the SharePoint Web Service to get the items of a list along with their attachments. The data view will display these items using a XSL we will define. As a bonus this method will allows us to display the list items on a different SharePoint site or collection than the list itself.

1 – Create or Open a page

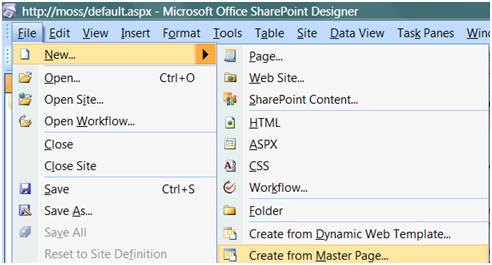
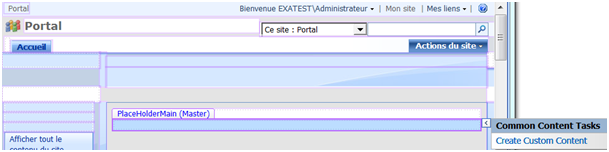
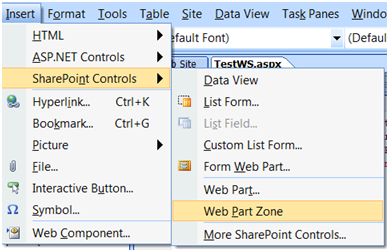
In SharePoint Designer after opening your site, either open an existing page or create a new one. I choose this last option: image Make some room for our content in the PlaceHolderMain zone of the page by creating a custom content. image Adding a Web Part zone isn’t mandatory but I strongly recommend it at this point. Click in the new Custom Content Zone you created in the design view, then click Insert|SharePoint Controls| Web Part Zone. image You should get something looking like that in the Design View: image SharePoint Designer is sometimes quite buggy, saving frequently from this point on might be a good idea. You can save the page wherever you want to. If you are creating multiple custom pages, creating a dedicated Document Library to hold these pages is a good idea; such a library already exists if you have activated the publication feature.

2 – Create a Web Service Data Source

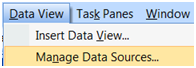
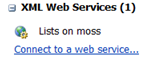
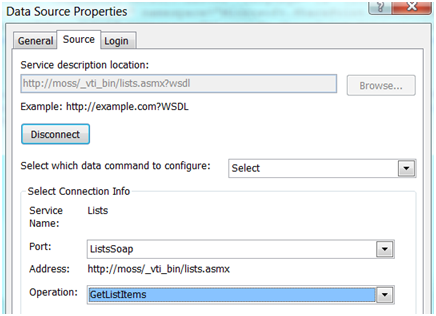
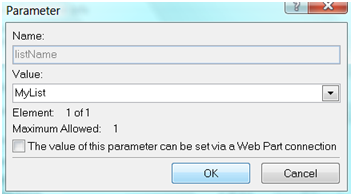
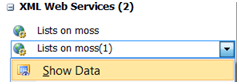
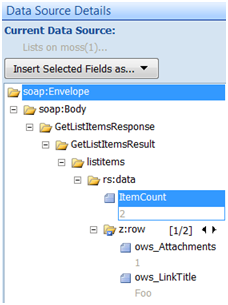
imageThe page is now ready to host our Data View web part. Open the Data Source view by clicking Data View| Manage Data Sources. imageChoose to connect to a web service: In the Service Description Location enter: http://SP_SITE_URL/_vti_bin/lists.asmx, then click connect and choose the GetListItems operation: image imageDouble click on the listName parameter and enter the name or guid (between brackets {}) of your list. imageValidate the Data Source Properties and check that it is working correctly by trying to see the data returned by this data source: If a new panel opens with the list data, it means it’s working. image

Troubleshooting:

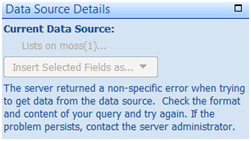
If it isn’t working you will be presented with an enigmatic error message giving you absolutely no details: image This can be caused by numerous reasons you want to check:

  • The name or guid of the list is invalid
  • You tried to specify other parameters of the Web Service such as QueryOptions or ViewFields. These parameters can’t be specified at this point as the SharePoint Designer Team Blog attests it (http://blogs.msdn.com/sharepointdesigner/archive/2008/06/20/data-source-issues-and-workarounds.aspx). We will modify those latter on.
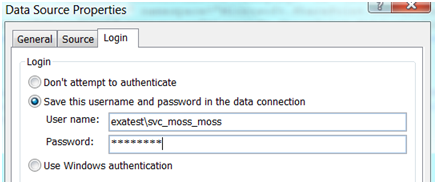
  • Problem of authentication, I need to investigate this problem but it seems like you sometimes can’t use the integrated authentication even when using a single WFE. In this case you have to change the Web Service Authentication method to basic and to specify a domain account that has the appropriate permission to read the list items and contact the web service.
Changing the Web Service authentication:

Open the Data Source properties image Open the login tab and choose basic authentication: image Save the details and try again to retrieve the data.

3 – Create the Data View Web Part

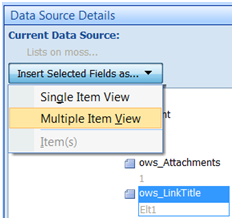
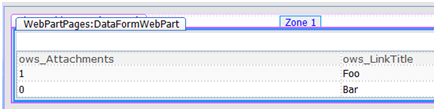
We now have a working Data Source, let’s create a web part to display it. In the Data Source Details, select the ows_LinkTitle and ows_Attachments properties and choose insert this field as a Multiple Item View (Note: you might need to select the Web Part zone in the design view of the page beforehand). image You shall now see something like that in the design view. image We know have a very basic Data View Web Part but as you may have noticed the ows_attachments fields just display the number of attachments but not the actual links to these attachments. We will see in part 2 of this walkthrough how to solve this.

SharePoint Walktrough - Displaying List Items with their attachments Part 2/2

image Recap The SharePoint Out Of the Box List View Web Part is quite powerful, yet it isn’t able to display the attachments of a List Item. It can show if an item has any attachments (with a nice paper-clip icon) but you won’t be able to download these attachments directly. I presented in Part 1 of this walkthroughhow to create a DataView part consuming the Lists.asmx Web Service in SharePoint Designer to display the elements of a list. We are now going to display the attachments of these list elements. To retrieve the attachments URLs we need to add an option to the Web Service Soap query, the “IncludeAttachmentUrls” option (details of the query options is available at http://msdn.microsoft.com/en-us/library/microsoft.sharepoint.spquery_properties.aspx). We could just open the datasource and change the QueryOptions parameter, that is if the SharePoint WSDL files were correctly defined… As it is not the case and SharePoint Designer itself isn’t perfect, you won’t be able to do that (see http://blogs.msdn.com/sharepointdesigner/archive/2008/06/20/data-source-issues-and-workarounds.aspx for reference). But there is a workaround!

4 – Modify the DataSource QueryOptions parameters

imageFirst you need to have access to the page source, so let’s switch SharePoint Designer to Split or Code view : In the code, search for the line starting with: “SharePoint:SoapDataSource”. On the same line you shall see something like “ </listName></GetListItems></soap:Body>”. image As you can see the parameters we defined in the Data Source Gui are found here and guess what, we can modify these parameters from here! So let’s add the parameter requesting the attachments url :

<queryOptions><QueryOptions><IncludeAttachmentUrls>TRUE</IncludeAttachmentUrls></QueryOptions></queryOptions>

So that the end of the soap request body looks like :

</listName><queryOptions><QueryOptions><IncludeAttachmentUrls>TRUE</IncludeAttachmentUrls></QueryOptions></queryOptions></GetListItems></soap:Body>

Save the page and check the result in the design view : image The ows_attachments field now contains the attachments URLs or 0 for list items with no attachments using the following format :

;#http://moss/Lists/MyList/Attachments/1/Piece.txt;#http://moss/Lists/MyList/Attachments/1/Piece2.txt;#

We still need to make some nice links out of this field. Time to put on your XSL designer gear.

5 – Modify the XSL Presentation

We first create a XSL template to transform the string given by the Web Service into a nice series of picture. You might use my sample below, paste this piece of code in the XSL part of the aspx page you are editing in SharePoint Designer (maybe just before the node “</xsl:stylesheet>”).

<xsl:template name="SplitAttachments">     
  <xsl:param name="str"/> 
  <xsl:choose>      
    <xsl:when test="contains($str,';#')">      
      <xsl:variable name="attachmentUrl" select="substring-before($str,';#')"/>      
      <xsl:if test="string-length($attachmentUrl) != 0">      
        <a href="{$attachmentUrl}"><img style="border:0px" src="/_layouts/images/attach.gif" alt='Open'/></a>      
    </xsl:if>      
    <xsl:call-template name="SplitAttachments">      
      <xsl:with-param name="str" select="substring-after($str,';#')" />      
    </xsl:call-template>      
    </xsl:when>      
  <xsl:otherwise>      
  </xsl:otherwise>      
  </xsl:choose>      
</xsl:template>

This XSL template uses a recursive template to parse the attachments and generate corresponding links and pictures. Now replace

<xsl:value-of select="@ows_Attachments"/>

By

<xsl:call-template name="SplitAttachments">    
<xsl:with-param name="str" select="@ows_Attachments" />     
</xsl:call-template>

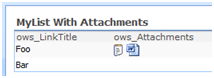
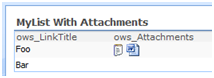
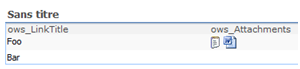
And you should see this : image The paper clip icon you see are actually pointing to the attachments.

6 – Pimp up my Data View

At this point our Data View Web Part works ok but isn't as nice as you might want it to be. As an example you might want to change these paper clips icons with icons representing the file type. The good news is that the XSL extension provided by WSS (default prefix used by SharePoint Designer is DDWRT) can handle this through a MapToIcon template. If you give a file extension to this template, it will return the icon filename corresponding to this filetype. Using the substring-after method to get the filetype we can imagine replacing :

/_layouts/images/attach.gif

By

/_layouts/images/{ddwrt:MapToIcon('',substring-after($attachmentUrl,'.'))}

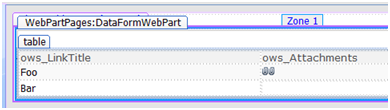
imageNow save the file and check the result : It still isn't perfect but from this point on things will be much easier to improve if you know your HTML and a bit of XSL.

7 – Conclusion

That’s it, you have got a functional Web Part to display your List. Using this method you can specify every parameters of the GetListItems method, as an example the ViewName parameter can prove usefull to filter items. If you need to test your parameter I would suggest you to try soapui.org. You can of course export this web part to put it another page, even on another page of another SharePoint farm (in this case, you will have to use the basic authentication mode unless kerberos authentication can do the trick). If you want to display another list you can just export the WebPart and edit the file before reimporting it. This might prove very useful to put this web part on a publication page as these pages can’t be edited using SharePoint Designer. If you need more details you can contact me by leaving a comment or using the "IM Me" box on the right of this page.